How is Damascus Steel Made?

Have you ever wondered how beautiful patterns and designs are formed while making swords, blades, and rings made of Damascus steel? Many blacksmiths and metal workers face problems choosing the right material, and temperature point, following the right steps. Due to a lack of proper guidelines about how Damascus Steel is made, one can feel uncertain about where to start and how to achieve the desired results.
The process of making Damascus steel is simple and unique. It involves layering two different kinds of metals, heating them to a certain temperature, and forging them together to create swirly patterns. After this, metal is dipped in an etching solution to reveal beautiful contrasts. By knowing specific forging techniques and other tools, you can create stunning pieces of wavy Damascus steel.
In this article, you will learn how to make Damascus steel from start to finish. I will explain in detail how to find the right material, the optimum temperature, and the forging steps. I have also included some tips on avoiding common errors to achieve the desired form of Damascus steel.
What is Damascus steel?
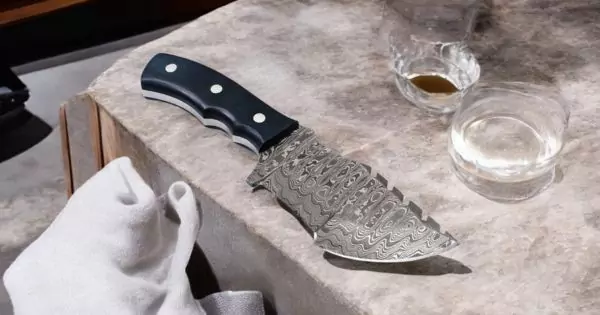
Damascus Steel is made up of an alloy of two different metals combined and forged together with special techniques at a certain temperature. It is best known for its durability, hardness, and wavy patterns mostly used to create sharp knives, swords, tools, and remarkable jewelry without losing its performance and beauty.
The name Damascus comes from Syria, where it was originally made. Historically, it was used to make weapon blades. The traditional methods of its making involve heating of wrought iron with carbon material in a closed container. An iron-carbon alloy is formed with 1.8% carbon. This alloy is then hammered into bars and then shaped into knives and swords.
Process of making Damascus Steel
The process of Damascus steel formation is easy to follow but time-consuming. The following are the most important steps that should be followed in its formation.
Finding the right Materials and tools
While creating high-quality Damascus Steel, one must be equipped with all the basic required materials and tools. I have gathered detailed information about the tools and the material required for its formation.
Steel
A high-carbon content steel is required. Typically, 1080 and 15n20, with a lot of nickel in it, are used. The nickel present in 15n20 creates a shiny and bright contrast when etched.
Flux materials
They help to catalyze the melting process of steel. Glass and fine silica sand are used for this purpose. Borax, from the grocery store, can also work in this regard. A “20 mule Team Borax” would be enough.
Ferric chloride
It is used in the final stage during the process of etching the steel. Ferric chloride helps to reveal a contrast between the metal and displays intricate and beautiful patterns, for which Damascus steel is known.
Metal scrap
It is generally added to the layers of steel before frogging to form a more complex structure which ultimately reveals unique patterns. Any kind of metal can be utilized for this purpose. It provides extra strength to the welding process and is used in reffing steel.
Rebar
It is commonly used as a temporary handle of brittle before it is placed into the forge. It helps to hold and manipulate the steel safely. It also helps in shaping various kinds of desired patterns.
Brass pins
It is used to hold and attach the knife handle with its blade to make it strong. Beyond its functionality, it also helps to increase its unique appearance and enhance attraction.
Quenching oil
After the forging process, the quenching oil helps to cool and harden the steel to increase its strength. The heated blades are dipped into the oil to cool it quickly and then it becomes part of its structure which makes it even more durable and strong. Vegetable oil can also be used as quenching oil.
Finishing medium
A finishing medium can be a finishing stone or a compound that is used to polish the blade. This process smoothens the blade, sharpens its edges, and gives it a beautiful professional shine. This is the final touch before marketing knives and swords made from Damascus steel.
Forge
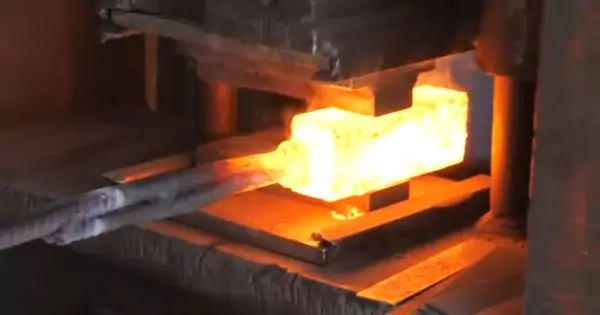
This is essential for reaching the high temperature that is required for steel layers. It would heat the billet to a high temperature of 1500 to 2300 Fahrenheit to ensure the melting and fusion of layers. Forge plays a key role in making Damascus steel.
Anvil and Hammer
The hard and flat surface of anil is used for shaping the steel. The proper anvil is ideal, so you can use any railway track piece or a large stone. While the hammer, a 3-pound cross-pein, is used to shape and weld the layers.
Tongs
It is used for handling the hot steel safely while working at the forge. It provides a grip on hot steel and you can move it either inside or outside the forge without the risk of burning.
Tempering Oven
A tempering oven is used to heat the steel after the process of forging to a relatively lower temperature. It is very essential to achieve the right balance of strength and flexibility. It adds durability to steel as well.
Drill or Drill Press
It is used to drill some holes in Damascus steel according to the shape and type of item that you are going to make, whether a knife, sword, or a piece of jewelry. Precise drill holes can be obtained from when you have assembled the piece or attached some handle.
Vise
It is a handy tool. It is used to hold and secure the steel or any workpiece while drilling, grinding, and twisting. It also helps to ensure accuracy and safety while you are shaping the steel.
Welding Tool (Welder)
A welder or welding tools are generally used at the initial stage. It is used to weld the layers of steel into the billet. It is not a necessary tool, as it provides extra support to hold the billet. If a welder is not available, you also wrap the steel with a metal wire to achieve its functionality.
Safety goggles
These are essential to save your eyes from sparks, flying debris, and metal fragments during frogging, welding, grinding, and drilling. This ensures you work safely without the risk of eye injury.
Leather gloves
These provide protection for your hands against heat, spark, and sharp edges while making blades and using other tools. Leather gloves are durable and help to prevent burns from froge and cuts from the blade.
Assemble the Billets
After you have gathered your materials and tools, the next step is to assemble the billets. Cut the billets according to the size needed, but if you cut a slightly larger piece, it will be easier to handle. Arrange these billets with compatible metal that will work well together during the forging and heating process.
Timing is everything when you work with Damascus. It is very important to know when to put billet into the forge or pull out. When it reaches the desired temperature and becomes red hot, subject it to pressure using a hammer or hydraulic press. Keep the thicker carbon steel layer on the outer side. This will protect the billet during the forging process.
Cut this elongated billet into two pieces, weld them together, and repeat the forging and pressing process until you achieve final solid billets with the desired number of layers. This step sets the foundation for distinctive patterns of Damascus steel that will be obtained as a result. Attach a temporary handle to move the billet stack in and out of the forge safely.
Folding the Steel Layers
The next step is folding and hammering the final solid billets to create multiple layers. Repeating folding, forging, and hammering combine the different metals, ensuring even properties like hardness and toughness.
Layers of billets fuse to eliminate the impurities, and the metal structure becomes more refined.
Traditionally, a two-time folding process is used. In this, we fold the steel billets two times to achieve multiple layers. This increases its strength and intricate patterns.
First fold
To begin, take the steel billet and heat it until it reaches a high temperature. By hammering, make it flat and then fold it in half. This creates two layers and then ensures the proper welding of these two layers.
Second fold
After the billet is folded one time, it is heated and hammered again. Then fold the billet one more time, resulting in four layers. This will further improve the strength and enhance bonding between layers.
With each fold the layers become finer and patterns become more intricate. Folding also contributes to the sharpening, durability, and hardness. The more the steel is folded the more aesthetic and strong the final product becomes.
Twisting the Billet
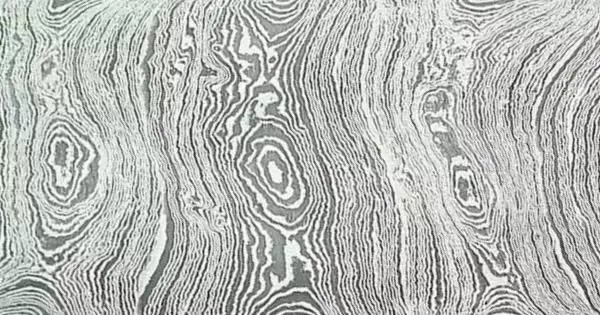
The next step is twisting, which involves the rotating of a heated billet. When a billet is twisted, it turns into a spiral shape. With progressive heating and twisting, the pitch (distance between the two spirals) becomes tighter and the layers wrap around each other in a helical pattern. When it is flattened and etched, the signature wavy patterns of Damascus steel appear.
This step plays a vital role in enhancing the strength and visual appearance. Twisting blends the layers more effectively and creates a strong bond between them. It also prevents the billet from cracking under pressure. Additionally, combining twisting with other techniques like folding, adds further complexity and beauty to the final product.

Tempering the steel
This next step increases the strength of the steel and improves its durability. The temperature for tempering the steel is between 350 to 400 Fahrenheit which lasts for about one hour. The temperature and timing are significant in this step, as they directly affect the quality of Damascus steel.
Repeat the process of tempering a few times unless or until you are satisfied with the results. This step removes the stress and keeps the steel hard and less brittle. Carefully monitor this step, as it is a very crucial step in making Damascus steel.
Etching and Finishing of Blade
After heating and tempering, steel undergoes etching and finishing revealing the unique patterns of Damascus steel. To etch you need to apply a mild acidic solution like ferric chloride or vinegar on the steel. This acid reacts with the steel layers, creates contrast, and reveals beautiful patterns.
The etching process is very critical if not performed in a specific time it can cause damage. Once the patterns become clear, rinse the blade with water to remove all acidic residue.
For finishing purposes, you have to sharpen, smooth, and polish the Damascus steel as it improves its appearance as well as functionality. Some tools like whetstone and sharpening systems are used to remove all imperfections and create sharper edges. This is the final step and it defines the quality of steel, so take proper time in this step and achieve the best results.
How Many Layers Are Ideal?
If you want to make something from Damascus steel, you must be wondering about the number of layers that would be enough. The American Bladesmith Society recommends that 300 to 500 layers are sufficient for making blades. But knife makers have crafted a knife with over half a million layers.
Modern techniques: How to Make Feather Damascus?
Feather Damascus is an improved form of Damascus steel which holds extremely attractive patterns that look like feathers or waves. However, making Feather Damascus is even more challenging than regular Damascus steel. This shows the creativity of blacksmiths.
Step 1: Layering and Heating
To make feather Damascus, start with stacking the layers of steel in an alternative, crisscross manner. In most cases, feather damascus is made up of 200-300 layers of equal thickness and they should be parallel to each other. Then heat the stack to about 2100 Fahrenheit.
Step 2: Press and Forge the Billets
After heating, join the billet with a hammer or press the layers until it turns into a single piece. The angle of the presser should be controlled. This billet creates a base for feather damascus. Now cut the billet into pieces and restack them. Again perform the above-mentioned process of frodging and pressing to obtain the final billet.
Step 3: Cutting the Billet Equally
Now carefully cut the final billet vertically into two equal pieces. If one side of the piece is thicker then grind it to match the other. Cool these pieces and add an extra steel layer on alternative sides of the pieces. This extra steel helps to stabilize steel when stretching and prevent the breakage of feather layers.
Now draw a wedge shape design on the alternating sides. Now cut the billets along the wedged and then heat it. Now press the billet gradually ensuring an iconic wavy “River on Fire” design is created on the central seam.
5 tips for making a Damascus steel
Following are some tips, if you follow these tips you can achieve for best results for sure.
Choosing the right steel types
Careful selection of steel ensures that your Damascus steel turns out strong, durable, and sharp-edged over time. So you must select the right steel with specific properties like toughness, hardness, corrosion resistance, and working ease when steel is fabricated.
Along with high-carbon steel, some alloys like S32V or D2 are also commonly used for making Damascus steel.
Placement of carbon-layered steel bars
When Piling up the steel bars to make billets, it is supplementary to placing carbon steel outside. If it is thicker, it would be best to place a thicker layer outside, so it gives dramatic results, especially when you place it into the forge.
Proper heat treatment techniques
To ensure the quality and durability of Damascus steel, the heating process should be done carefully at a specific temperature. Then, it rapidly or slowly cools down to achieve the desired hardness and toughness. Steps such as normalizing, quenching, tempering, and annealing are involved in heating techniques.
Designing the pattern
Blacksmiths generally use a combination of high-carbon and low-carbon steel to create contrasting patterns. Designs can be swirly, wavy, broad lines, or geometric patterns. Careful planning of size, placement, and orientation of layers enhances both the functionality and beauty of Damascus steel.
Sharpening and polishing the blade
Use high-quality sharpener stone to grind the edges of Damascus steel. Start with coarse grifts and then move to the finer ones, to make a smoother surface. Try to polish the blade with leather strop and it will add some mirror-like shine to the Damascus blades.
Conclusion
Making Damascus steel involves a blend of skill and creativity. By knowing all the required materials and mastery of forging techniques, you can create Damascus steel with stunning patterns by following simple steps. The modern ways let you create Damascus steel with improved functionality and beautiful patterns. Learning from a master saves time, frustration, and effort. Hands-on guidance makes the process much clearer, especially when folding and forging the billet.


